Serverless Database CRUD Example With FaunaDB and Netlify Functions
Be productive and get your application working quickly with the serverless paradigm. 👌
In this post, I will show you how to create a simple serverless database and CRUD APIs using Netlify Functions & FaunaDB.
Here is the game plan:
- Part 1 - Create & Deploy Test Netlify Function
- Part 2 - Initialize your serverless database
- Part 3 - Create & Deploy CRUD APIs
Part 1 - Create & Deploy Test Netlify Function
Creating netlify functions is straight forward.
Here is what we are going to do:
- Step 0: Initialize the project
- Step 1: Hello world function
- Step 2: netlify-lambda
- Step 3: Build & serve script
- Step 4: Netlify config file
- Step 5: Deploy hello world function
1.0 Initialize the project
Our project will look something like this:
├── README.md
├── configs
│   └── webpack.functions.js
├── lambda
│   ├── create.js
│   ├── customers.js
│   ├── delete.js
│   ├── hello.js
│   ├── read-all.js
│   ├── read.js
│   └── update.js
├── netlify.toml
├── package.json
├── src
│   ├── customers
│   │   ├── create.js
│   │   ├── delete.js
│   │   ├── read-all.js
│   │   ├── read.js
│   │   └── update.js
│   ├── customers.js
│   └── hello.js
└── yarn.lock
1.1 Hello world function
Let's add our hello world function.
// src/hello.js
exports.handler = function(
  event, // Netlify event
  context, // Netlify context
  callback // Your callback
) {
  callback(null, {
    statusCode: 200, // response status code
    body: 'Hello, World' // response body
  });
};
You can find out more about how netlify functions work at Netlify's docs.
1.2 netlify-lambda
Next, you will need the tool netlify-lambda.
netlify-lambda helps you with building and developing locally your netlify functions.
Install it like this:
yarn add netlify-lambdanpm install netlify-lambdaGenerally, to develop netlify functions you can choose from two tools:
- Netlify Lambda
- Netlify Dev
netlify-lambda provides a build step where we can add webpack/babel configurations (we need that).
Find out more about when to use Netlify Dev and Netlify lambda from here.
So far so good..
1.3 Build & serve scripts
Now let's add the npm scripts
  // package.json
  "scripts": {
      "serve": "netlify-lambda serve ./src",
      "build": "netlify-lambda build ./src"
  }
1.4 Netlify config file
To make our configurations explicit to Netlify, we will use netlify.toml file.
You can read more about netlify.toml from the official documentation.
Here is a basic example of a netlify.toml:
# netlify.toml

[dev]
    command = "npm run serve"
    functions = "lambda"

[build]
    functions = "lambda"
The build configuration simply tells Netlify where to find your built functions during deployment.
The dev command is stating how to run the functions locally.
Now our hello world function is in good shape! 👌 next thing...
1.5 Deploy hello world function
Since I'm using Github to host the project source code, I can connect the Github project's repository to Netlify.
If you are not sure how to do that, check out this tutorial.
Its time, let's build our functions!
yarn run buildOnce the script finishes, you should have a new directory called lambda. This directory is where all the built functions are stored.
Now let's commit everything and push to the remote branch.
Since this is a tutorial we will be pushing straight to master. 😱 but please don't do that at work...ok? 😌
Once you have your application successfully deployed, netlify will generate a random URL for your project such as random-word-m34343.netlify.com .
Let's test our hello world function!
Navigate to TEMP_SUBDOMAIN.netlify.com + .netlify/functions/hello.
You should see the beautiful "Hello, World"! 💯
Now you can take a break and drink some water, water is good for you! 🙂
Part 2 - Initialize your serverless database
To get your serverless faunaDB up and running you will need to do these things:
- Step 1: Create a new FaunaDB database
- Step 2: Create a new FaunaDB API key
Easy, let's start!
2.1 New FaunaDB database
Using FaunaDB's console. Create a new test database and pre-populate it with data.
Next, let's get an API key for our new test database.
2.2 FaunaDB API key
Using FaunaDB's console. Create a new server API key. Here is a quick gif that explains how to do that:

P.S: If you were not sure how to follow these steps, faunaDB's documentation is your friend.
Now that we have our test data, let's create those CRUD functions and make it happen.
Part 3 - Create & Deploy CRUD APIs
Ok now, this is serious business, here is the plan:
- Step 1: Add npm packages
- Step 2: Add webpack config file & env variables
- Step 3: Create GET /customers endpoint
- Step 4: Create POST /customers endpoint
- Step 5: Create PUT /customers endpoint
- Step 6: Create DELETE /customers endpoint
- Step 7: Deploy functions to Netlify
3.1 Add npm packages
We need to install these packages: faunadb, dotenv, and webpack
yarn add faunadb@2.7.0 dotenv webpacknpm install faunadb@2.7.0 dotenv webpack👉 At the time of writing this tutorial, faunadb package had an issue with serverless functions. Hence, the locked package version. Use that version for now. For more info, you can check the github issue.
3.2 Add webpack config file && env variables
3.2.1 Webpack config file
We have to add some custom webpack configurations. Why? you may wonder.
Well, there seems to be another issue with faunaDB's javascript client & netlify functions. So I found a workaround for you! 👍
Here is the workaround
// configs/webpack.functions.js
var webpack = require('webpack');
/* fix for https://medium.com/@danbruder/typeerror-require-is-not-a-function-webpack-faunadb-6e785858d23b */
module.exports = {
  plugins: [new webpack.DefinePlugin({ 'global.GENTLY': false })],
  node: {
    __dirname: true
  }
};
Next, you will need to update your npm scripts to use the configurations using the --config flag.
// package.json
"scripts": {
    "serve": "netlify-lambda serve ./src --config ./configs/webpack.functions.js",
    "build": "netlify-lambda build ./src --config ./configs/webpack.functions.js"
}
3.2.2 Env variable
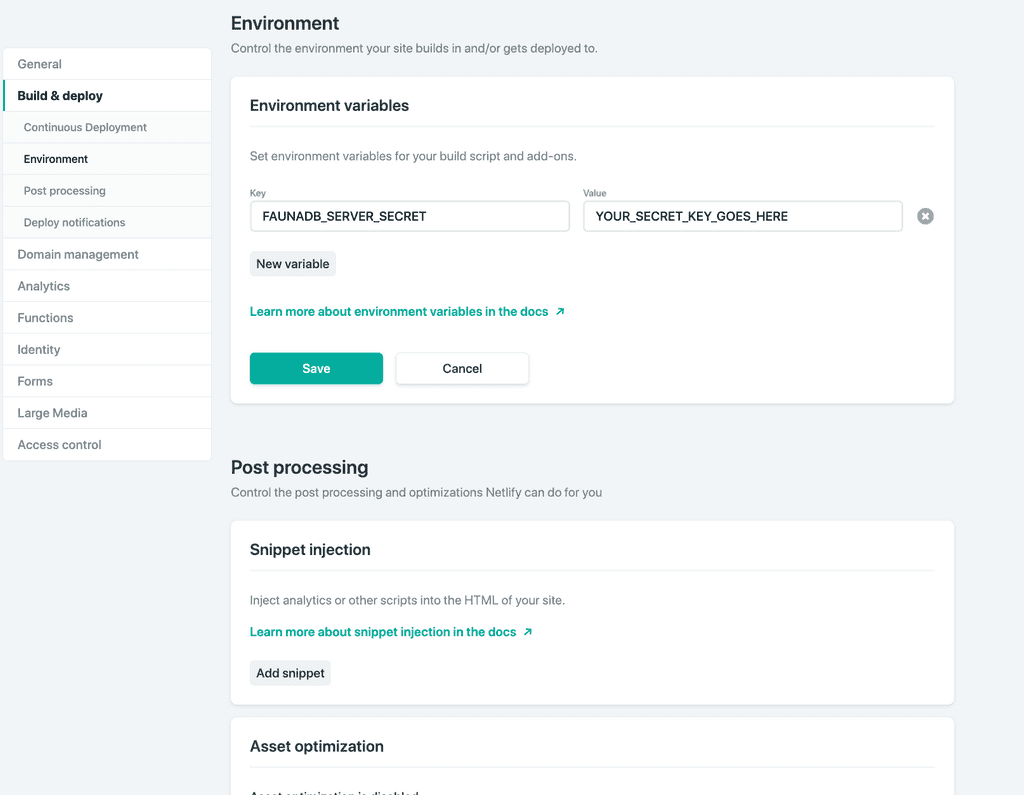
For local development, we need to create a .env file in the root of your project that will include all the API secrets.
FAUNADB_SERVER_SECRET=YOUR_SECRET_KEY_GOES_HEREFor production, you must add the same variable as an environment variable to Netlify deploy settings.
An example of how this would like:
Now we are going to create our CRUD functions, are you ready?
3.3 Create GET /customers endpoint
Here are the read functions:
// src/customers/read-all.js
require('dotenv').config();

const faunadb = require('faunadb');
const q = faunadb.query;
const client = new faunadb.Client({
  secret: process.env.FAUNADB_SERVER_SECRET
});

exports.handler = async (event, context) => {
  console.log('Function `read-all` invoked');
  return client
    .query(q.Paginate(q.Match(q.Ref('indexes/all_customers'))))
    .then(response => {
      const itemRefs = response.data;
      // create new query out of item refs. http://bit.ly/2LG3MLg
      const getAllItemsDataQuery = itemRefs.map(ref => {
        return q.Get(ref);
      });
      // then query the refs.
      return client.query(getAllItemsDataQuery).then(ret => {
        // wellformedData includes customers id in the response.
        const wellformedData = ret.map(malformedResponse => {
          return {
            id: malformedResponse.ts,
            ...malformedResponse.data
          };
        });
        return {
          statusCode: 200,
          body: JSON.stringify(wellformedData)
        };
      });
    })
    .catch(error => {
      console.log('error', error);
      return {
        statusCode: 400,
        body: JSON.stringify(error)
      };
    });
};
// src/customers/read.js
require('dotenv').config();
const faunadb = require('faunadb');
const q = faunadb.query;
const client = new faunadb.Client({
secret: process.env.FAUNADB_SERVER_SECRET
});
exports.handler = async (event, context) => {
const id = event.id;
console.log(`Function 'read' invoked. Read id: ${id}`);
return client
.query(q.Get(q.Ref(`classes/customers/${id}`)))
.then(response => {
console.log('success', response);
return {
statusCode: 200,
body: JSON.stringify(response)
};
})
.catch(error => {
console.log('error', error);
return {
statusCode: 400,
body: JSON.stringify(error)
};
});
};Don't worry about the file names, we will map everything to /customers endpoint later on.
3.4 Create POST /customers endpoint
// src/customers/create.js

require('dotenv').config();
const faunadb = require('faunadb');

/* configure faunaDB Client with our secret */
const q = faunadb.query;
const client = new faunadb.Client({
  secret: process.env.FAUNADB_SERVER_SECRET
});

/* export our lambda function as named "handler" export */
exports.handler = async (event, context) => {
  /* parse the string body into a useable JS object */
  const data = JSON.parse(event.body);
  console.log('Function `create` invoked', data);
  const item = {
    data: data
  };
  /* construct the fauna query */
  return client
    .query(q.Create(q.Ref('classes/jobs'), item))
    .then(response => {
      console.log('success', response);
      /* Success! return the response with statusCode 200 */
      return {
        statusCode: 200,
        body: JSON.stringify(response)
      };
    })
    .catch(error => {
      console.log('error', error);
      /* Error! return the error with statusCode 400 */
      return {
        statusCode: 400,
        body: JSON.stringify(error)
      };
    });
};
3.5 Create DELETE /customers endpoint
// src/customers/delete.js
require('dotenv').config();

/* Import faunaDB sdk */
const faunadb = require('faunadb');

const q = faunadb.query;
const client = new faunadb.Client({
  secret: process.env.FAUNADB_SERVER_SECRET
});

exports.handler = async (event, context) => {
  const id = event.id;
  console.log(`Function 'delete' invoked. delete id: ${id}`);
  return client
    .query(q.Delete(q.Ref(`classes/customers/${id}`)))
    .then(response => {
      console.log('success', response);
      return {
        statusCode: 200,
        body: JSON.stringify(response)
      };
    })
    .catch(error => {
      console.log('error', error);
      return {
        statusCode: 400,
        body: JSON.stringify(error)
      };
    });
};
3.6 Create PUT /customers endpoint
// src/customers/update.js
require('dotenv').config();
const faunadb = require('faunadb');

/* configure faunaDB Client with our secret */
const q = faunadb.query;
const client = new faunadb.Client({
  secret: process.env.FAUNADB_SERVER_SECRET
});

/* export our lambda function as named "handler" export */
exports.handler = async (event, context) => {
  /* parse the string body into a useable JS object */
  const data = JSON.parse(event.body);
  console.log('Function `create` invoked', data);
  const item = {
    data: data
  };
  /* construct the fauna query */
  return client
    .query(q.Update(q.Ref('classes/customers'), item))
    .then(response => {
      console.log('success', response);
      /* Success! return the response with statusCode 200 */
      return {
        statusCode: 200,
        body: JSON.stringify(response)
      };
    })
    .catch(error => {
      console.log('error', error);
      /* Error! return the error with statusCode 400 */
      return {
        statusCode: 400,
        body: JSON.stringify(error)
      };
    });
};
Now you should have the basic functions in place. Next step, let's put it all together! 🙌
You can take another break, remember water is good for you!
3.7 Put it all together
Here is where we map all the other functions to the one /customers endpoint.
// src/customers.js
exports.handler = async (event, context) => {
  const path = event.path.replace(/\.netlify\/functions\/[^\/]+/, '');
  const segments = path.split('/').filter(e => e);

  switch (event.httpMethod) {
    case 'GET':
      // e.g. GET /.netlify/functions/customers
      if (segments.length === 0) {
        return require('./customers/read-all').handler(event, context);
      }
      // e.g. GET /.netlify/functions/customers/123456
      if (segments.length === 1) {
        event.id = segments[0];
        return require('./customers/read').handler(event, context);
      } else {
        return {
          statusCode: 500,
          body:
            'too many segments in GET request, must be either /.netlify/functions/customers or /.netlify/functions/customers/123456'
        };
      }
    case 'POST':
      // e.g. POST /.netlify/functions/customers with a body of key value pair objects, NOT strings
      return require('./customers/create').handler(event, context);
    case 'PUT':
      // e.g. PUT /.netlify/functions/customers/123456 with a body of key value pair objects, NOT strings
      if (segments.length === 1) {
        event.id = segments[0];
        console.log(event.id);
        return require('./customers/update').handler(event, context);
      } else {
        return {
          statusCode: 500,
          body:
            'invalid segments in POST request, must be /.netlify/functions/customers/123456'
        };
      }
    case 'DELETE':
      // e.g. DELETE /.netlify/functions/customers/123456
      if (segments.length === 1) {
        event.id = segments[0];
        return require('./customers/delete').handler(event, context);
      } else {
        return {
          statusCode: 500,
          body:
            'invalid segments in DELETE request, must be /.netlify/functions/customers/123456'
        };
      }
    case 'OPTIONS':
      // To enable CORS
      const headers = {
        'Access-Control-Allow-Origin': '*',
        'Access-Control-Allow-Headers': 'Content-Type',
        'Access-Control-Allow-Methods': 'GET, POST, PUT, DELETE'
      };
      return {
        statusCode: 200, // <-- Must be 200 otherwise pre-flight call fails
        headers,
        body: 'This was a preflight call!'
      };
  }
  return {
    statusCode: 500,
    body: 'unrecognized HTTP Method, must be one of GET/POST/PUT/DELETE/OPTIONS'
  };
};
Did you notice that OPTIONS case?
I thought to put it there for your reference. Depending on your set-up and how you will consume this API you might need it.
Deploy functions to Netlify
Time to deploy our changes!
Let's build our new functions using the command yarn run build.
Commit everything and push to the remote branch.
Remember? Don't push to master straight at work! 😌
Now its testing time! 🎉 🎉
You can use something like postman to test your function.
Sending a GET request to TEMP_SUBDOMAIN.netlify.com/ + .netlify/functions/customers should look like this:
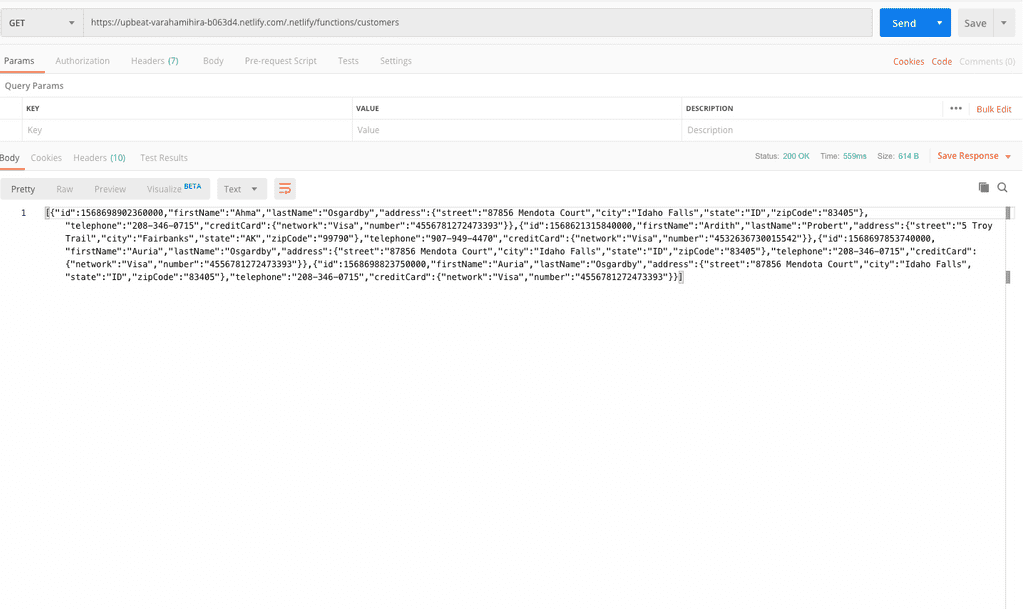
Everything is working ? Good job! Tap yourself on the shoulder and take the rest of the day off! 👏
Resources
You can find all the source code for this tutorial here.
Also, here are more netlify functions examples.
That is it my friend, enjoy your serverless database and continue building! 🔥
I am working on producing video tutorials that explain in more detail how you can build a serverless web app using Nuxt, Typescript, Netlify Functions & FaunaDB.
If you are interested and would like to hear from me when these tutorials are published, sign up for nordschool's newsletter or follow us on twitter.
Support us
Enjoyed the article? Share the summary thread on twitter.